I've had a few questions in recent weeks about my process for making custom cards. I'm more than happy to answer and questions individually through email or comments, but thought it might be helpful to have a short tutorial covering some of the basics, if people want to give it a try themselves.
I'm going to cover two parts - this installment will go over the process of designing a custom card,
while the second part will cover printing out the finished product.
I've been making custom cards in one form or another for about nine years. I first learned some basics of Photoshop in high school working on our school newspaper and yearbook. And by learned, I mean I was well versed in putting the heads of my friends and classmates atop the bodies of celebes and livestock. I started making really rudimentary custom cards, mostly for my own amusement. A few years later, began creating custom Allen & Ginter style cards to mail out to retired Pirate players. But from about 2008 until last summer, I had pretty much forgotten about custom cards. In the time between? Well, the technology both in terms of home printing and the software grew by leaps and bounds, as did the quality of photograph available with just a quick Google search. The first customs I made were pretty rudimentary. And even the customs I made 4 or 5 months ago seem pretty rough compared to what I can do now.
So the lesson here? To channel my inner Bob Ross, if you have the time and patience, you can learn to make your own cards. Start simple, and slowly build up your knowledge of techniques and tools within the program. Don't be afraid to try, experiment, and occasionally fall flat on your face.
For this tutorial, I'm going to show you how to design a template for a 1991 Fleer card. I use Photoshop CS5 for all my designs. Adobe programs can be a little pricey if you're paying full sticker price. Free alternatives, such as Gimp, work on the same basic concepts, but may have different names, tools, or features. But Adobe runs sales pretty frequently, and of course there are always alternative methods to acquire software that is very similar in name to the team I root for.
When I regained interest in customs a while back, I found that while the number of people creating customs and the quality of the work had increased ten fold, there was virtually no information out there as to how to actually do this yourself, and most of the folks making customs were tight lipped or downright rude about their methods. I don't know whether it's because they were making money off commissions, or (as is true with many hobbyists) just didn't have very gracious social skills. Heck, I'd imagine a lot of the custom makers are those same high-pitched-voice kids swearing and screaming all over XBox Live when they shoot somebody playing Halo...or whatever it is that teenagers do these days. I've spent a lot of hours practicing and refining the techniques I use to make these cards. But I would much rather share that information to help somebody else find the same enjoyment out of making their own cards that I found than to horde the information.
Let me just hit a few more brief points, and then we'll jump into the tutorial.
- Generally speaking, designs that utilize straight lines are easier than ones featuring curved or faded elements. Start with a simples, and slowly build up to more complex ones.
- I like to build all my templates from scratch. I see people creating customs that basically take a scan, erase the photo, paint over the text, and add in their own image and text. That's how I started doing customs in high school. But I've found it's worth the time and energy to build a template from scratch (or as much as possible), because you'll have more options in tweaking the design, and clearer images and colors.
- There are a lot of resources out there for photos. Keep in mind that just like actual cards, a good custom needs a good photo. Learning some basics of how to retouch or edit a photo can go a long way.
The basic concepts in this design can be applied to just about any card design, whether you're recreating an existing design or making your own from scratch. For the designs I recreate, I use a method that I call "tracing." I will use an image of the card as the background, and then build the elements of the card on top of that layer. This allows me to make sure I am matching proportions, placement, color, and size as closely as possible to the original card design. When the template is build, you can delete or hide the original image and save the file as a Photoshop document to continue creating more customs.
The first step is to find a nice, high res if possible, image a card from the set you're looking to recreate. Ideally, I try to find a graded copy in a 9 or a 10 since those are likely to have the best centering. A basic Google search and then filtering by larger image sizes should give you what you need without too much trouble. And perhaps unsurprisingly, bloggers are some of the best sources since we frequently post high quality scans of low end sets. This scan actually came from the great blog Tim Wallach.


To add the black inner border to the photo, double click on your yellow border layer. Select Stroke, and set the slider to 4.

The "tracing" card often won't match up exactly with the elements on your template, due to centering, color differences, etc. Be sure to frequently switch between your "tracing" layer and the actual border frame (your yellow square) to make sure things look the way you want.
Repeat that for the three similar sized lines.
If you hide the background layers (Wallach card), your template should look like the photo above.

There is an awesome online tool that allows you to upload an image, and (more often than not), it will tell you which font is being used. Sometimes the image may need to be cropped to remove other "noise" in the image that can confuse the computer. In the case of 1991 Fleer, Casad-Serial Bold looks like the closest match. Not quiiiite exact, but it's pretty darn close. Most fonts you will need can be found online for free, and if not there is usually a very close approximation available. It's just a matter of taking the time.

So your "traced" template would ultimately look like this. At this point, you have a fully finished template. From this point, you can essentially turn this card into one of anything or anyone, from Ken Griffey, Jr. to little Timmy in his T-Ball uniform. This card frame is virtually identical to the original card we started out with. But unlike the scanned image, we can have a higher resolution and less chance of pixellation on this template.
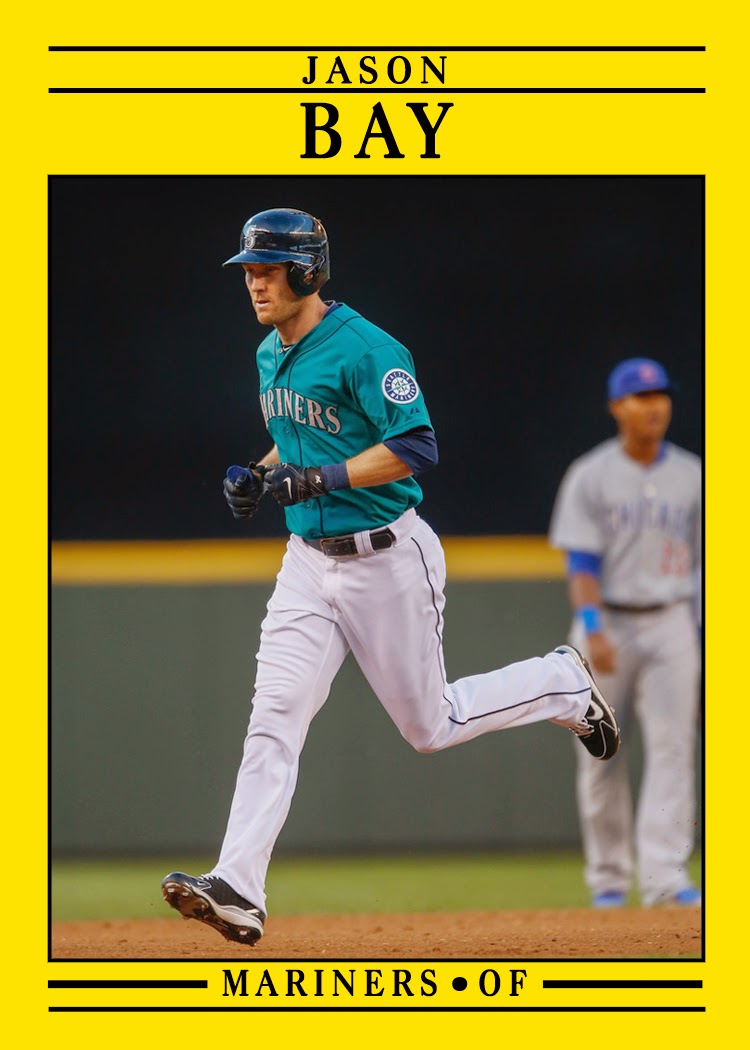
I decided to throw together a Mariners card of former Bucco Jason Bay. I just love the Mariners emerald jersey, and Bay only had one card in his short time in Seattle. You'll note sometimes cards will require adjustments depending on what team. Some cards might require changing accent colors, while in this case the longer team name meant the black lines on either side needed shortened.
My best advice is to start simple. Designs with relatively few layers and elements are a good place to start as you get accustomed to the process and to the various techniques you'll need. I avoided anything with a curved element for months! On the flip side, some templates I put together early on in my custom experimentation ended up taking a lot longer than they could have simply because I didn't know at the time, and learned down the road.
And learning is key. I'm far from a whiz, and pick up new techniques and ideas quite literally with every template I build. With a little spare time, determination, and youtube tutorials, it's not hard to come up with some really cool unique pieces for your collection.
I've been toying with the idea of making customs and I have a few ideas on the burner. Photoshop is now avail online for just 10 bucks a month which isn't bad. Thanks for taking the time to share your knowledge.
ReplyDeleteI saw that recently. I'd still suggest maybe having an older version of Photoshop as a backup so you can still access your files if you canceled the subscription. But that's definitely a much lower cost alternative to forking out hundreds for the latest version! If you decide to try your hand at some customs, feel free to get in touch if you have any questions!
DeleteNicely done! As one of the custom card makers who may have come across as tight-lipped to people who asked, it's never been a matter of clutching hard-earned secrets to my breast as much as getting wide-eyed and thinking "Where do I even start in explaining what I do?" You've done a good job of describing what's involved, and I hope you inspire others to give customs a shot.
ReplyDeleteI've never been clear on what are some of the best places to get fonts, perhaps you can touch on that in a future post.
Looking forward to Part 2!
That definitely wasn't directed toward you, so hope you didn't take it that way. More the custom makers on card forums, who act like what weight paper they use is a state secret.
DeleteI'm a little nuts about fonts - I think I have a couple hundred installed in addition to the standard ones that come pre-installed on a computer. I'll definitely put together a font primer, though it may end up being the least interesting thing ever written. I was thinking about going into more detail about the fonts in this post, but it was already running a little long.
I didn't think you meant me... but I have had people ask me about how to do it and I feel a little bad because I honestly didn't know what to say.
DeleteThat is really cool - I've been interested in trying to make some customs at some point, but didn't know where to start...
ReplyDeleteI would like to know the name (or URL) of the font recognition tool - do you have a link?
Oops, there was supposed to be a link in the post.
DeleteThe page is https://www.myfonts.com/WhatTheFont/ It's not 100% foolproof, but it's been a huge help for some of those really strange fonts like 2008 Topps or 1986 Topps.
If you start making customs and have any questions, feel free to get in touch!
Awesome - thanks!
DeleteThat is really cool Mark. Pretty soon you are going to be selling your customs online!
ReplyDeleteI've taken a couple commissions for people, but it's well worth the time and effort just for my own PC. There's something really satisfying about holding the card in your hand after its printed out.
DeleteSuper great tutorial. I really can't wait for the printing post, as that's where I'm hung up at the moment.
ReplyDeleteI've got nicely built '59 and '71 Topps templates that I've made, if you'd like them.
Oh, and the other question: are you making backs? I really want to attempt to put stats on mine. I'd love to try out the '71 OPC back.
You know what, I've never made a card back for any of the customs. It's not something I ever really gave any thought to, but might be neat for some of the Jack Wilson customs I'm making. That '71 OPC back is awesome - had never seen one of those before.
DeleteI'll try to get the printing tutorial up tonight.
Very cool, Mark. As I've told you, the customs you slipped into your latest trade package to me were extraordinary.
ReplyDeleteDon't think those are the last ones you'll see! These customs are a bit addicting.
DeleteNice post Mark! Although I have not made many custom cards (from scratch) like this one I have dabbled a bit. My latest creations are the All-Star Game Commemorative glossy cards that came in packs of Topps from 1984-1991. I did not start from scratch but from the highest quality scan I could find. I then deleted the original picture, year, name, position, etc (sometimes pixel by pixel) and then replaced them. I know what you mean about fonts, I go a little crazy when trying to match up fonts exactly.
ReplyDeleteYou can view a few of the AL cards here - https://2015toppsjourney.wordpress.com/2015/03/30/all-star-game-commemorative-custom-cards/ and the NL cards here - https://2015toppsjourney.wordpress.com/2015/04/06/all-star-game-commemorative-custom-cards-12-22/
Hopefully I can create some new designs like the Nola Ryan you sent to Nick.
Keep up the good work.
Jason
P.S. - I added a link to your blog from mine, hope you don't mind.
Nice work! Those Glossy All-Star cards were some of my favorites - I remember getting a bunch of them in repacks in the mid 90's. The fonts can be maddening, but it really can make or break the card if you can't find something close.
DeleteThanks!
Delete... pbobross.blogspot.com
ReplyDelete